1= 2019 in review
2= 2020 on Horizon (set goals, new techniques/art forms, etc)
3= create an entry page with dried&/or silk flowers
4= one technique you find yourself using repetitively
On January 3rd the journal prompt was create a page with dried &/or silk flowers. Wow, I was like really? That Yvonne sure is not making this year for me, whatever was I going to do??? Who has dried flowers in the middle of winter? But then I remembered; omg, you won't even believe it...I was given a lovely gift from the Pastor's wife's Mother from our church....I never knew the mother but she made cards. I was given a couple of boxes of crafty goodies that I was welcome to go through and keep what I wanted and distribute what I did not want as I pleased. I am so very rarely ever thought of for such things. You can imagine that this made me happy and that I was excited to get home and check it out. Inside one of the boxes was a box of pressed flowers. Yes, real pressed flowers, they were an awesome find, and of course one of the things I kept, for one of those "just in case I need it" projects. And for January's challenge, of course was the day that I needed them for and just happened to find it...well, it took me a little bit, but I found them, and this is what I have done with them so far, I decided I was going to make a back ground out of them. And I am quite impressed with how this project turned out. Here is the photo:
January 4, 2020
1= 2019 in review
2= 2020 on Horizon (set goals, new techniques/art forms, etc)
3= create an entry page with dried&/or silk flowers
4= one technique you find yourself using repetitively
Now this one is an easy one! The very first time I ever saw this technique was quite a while back, like maybe a few years....at least. There were a set of video's on this site that offered demonstrations of a variety of techniques. I love these video's because they are short, to the point, and well demonstrated without any silly chatter going on at all but belly dancing music. Here is the link: OneMinuteMuse it is the 3rd video, you can actually see the word "Saran" underneath the video before the rest of the name of it disappears. Or here is the link to the actual video if you can't find it. Saran Wrap Technique.
I recently found another site called Cloth Paper Scissors, where they have their own version of this technique that they call "That's a Wrap" with a beautiful written out description of step by step exactly how to do it. I followed this and I ended up with 5 beautiful pages of this technique, so you cannot go wrong! I did not get photos of all 5 pages but here are 3 different colours of ATC's that I'd already cut down before realizing that I was going to be documenting this on my blog. But anyway here is a photo of 3 different colours of what I did.
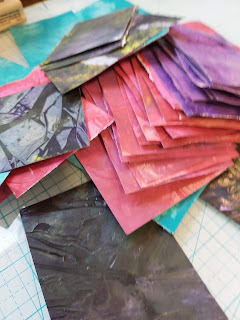
Here is a photo of a pile of the ATC's that I was able to cut down from these beautiful pages I created and cut:
And last, but not least, here is the description they use on their site to describe how to do it, again, follow their direction step by step and you just will not go wrong, I promise!
1. Lay down a wash in a strong color or combination of colors.
2. Next, lay a crumpled piece of plastic wrap on top of your painting, making sure that it is in contact with the wet pigment.
3. Let the painting dry with the plastic wrap in place; this may take 24 hours or more. When you remove the plastic wrap, there will be lines in the wash left by wrinkles in the wrap. These lines can be enhanced with metallic colors or white ink to form more pronounced and decorative abstract shapes.
For softer lines, remove the plastic wrap before the painting is completely dry. You can also try this technique with wax paper or aluminum foil.
I love this technique not just because of the effect, but because you can line up several pieces of watercolor paper, paint on your wash, cover them with plastic, and go do something else while your background paintings "cook."
Jacqueline shows how to create so many watercolor art techniques for textured backgrounds, including using salt, sand, charcoal, powdered metallics, alcohol, Rit dye, absorbent ground, and more.
It's all in The Cloth Paper Scissors Book, along with scores of other techniques, tips, projects, and inspiration. (This is not written by me, its taken directly from the Cloth Paper Scissors website.)
P.S. I just used a piece of plain white cardstock and cheap dollar store acrylic paints, So it works with both.


No comments:
Post a Comment
Thank you for your comments